Any super bulky weight yarn. I used 1 skein of Thick & Quick
N size crochet hook
Instructions:
Note: at the end of each round, slip stitch to the first stitch from the roun.
Note: ch at beginning of round does NOT count as a stitch.
Chain 15
Being careful not to twist, join to make a circle. Round 1: ch 2, *2dc, dc in next 2* repeat around (20) Round 2: Ch 2, *2dc, dc in next 3* repeat around (25) Round 3: Ch 2, *2dc, dc in next 4* repeat around (30) Round 4: Ch 2, *2dc, dc in next 5* repeat around (35) Round 5: Ch 2, *2dc, dc in next 6* repeat around (40) Rounds 6 – 11: ch 2, dc around (40) Round 12: ch 1, sc around (40)
My son is obsessed with Minecraft. I really don’t understand the point of the game, but he seems to have fun playing it (in very limited quantities). As it’s still cold in the mornings here, I figured it was a good time to make him his own pair of Fingerless Gloves. I designed the pattern in the morning, knit them up while he was at school, and presented them to him when he got home. To say that he was happy is a gross understatement.
Of course, I had to share the pattern with you.
Fits roughly ages 5-12.
Supplies:
Yarn:
Green, Dark Brown, Light Brown and Black worsted weight yarn (I used Vanna’s choice but the sky’s the limit!)
Size 8 DPNs (5.0mm) and a darning needle
First mitt: The Dirt Block
Cast on 32 in light brown
Rows 1-12: K2 p2 ribbing Row 13-14: knit around
Switch to Dark Brown
Row 15: knit
Start to Shape Thumb:
Row 16: K2, pm, kfb, k2, kfb, pm, k to end Row 17: Knit Row 18: K2, sm, kfb, k4, kfb, sm, k to end Row 19: Knit Row 20: K2, sm, kfb, k6, kfb, sm, k to end Row 21: K2, slip 10 stitches onto scrap yarn, cast on 4 using back loop, k to end Rows 22-28: Knit around
Starting colorwork: (switching to green as necessary)
Rows 29-33 as above (you will repeat the colorwork twice)
Rows 34-35: K2, p2 around
Bind off and weave in ends.
Second Mitt: The Creeper
Using Green, Cast on 32
Rows 1-12: K2 p2 around Rows 13-15: K around
Start shaping thumb
Row 16: K2, pm, kfb, k2, kfb, pm, k to end Row 17: K around Row 18: K2, sm, kfb, k4, kfb, sm, k to end Row 19: K around Row 20: K2, sm, kfb, k6, kfb, sm, k to end Row 21: K2, slip 10 stitches onto scrap yarn, cast on 4 using back loop, k to end (this is the first row of the colorwork)
Continuing colorwork as below:
Row 22-32 K8, proceed with colorwork as above, k to end for next 11 rows
Rows 33-34: K2, P2 around
Bind off and weave in ends.
Thumbs:
Creeper mitt use green; dirt block use dark brown.
Pick up 10 stitches from scrap yarn and as many stitches as you want from the other half of the mitt.
Row 1: Decrease stitches as you want until you have 12 stitch on your needle.
I love coffee. I prefer darker roasts. It started when I was pregnant with my 2nd and exhausted all the time. I started getting coffee before work. Then my daughter was born and every time I drank coffee she screamed. Until she was 8 months old.
Miraculously after that I was able to start drinking coffee again. I became a bit of a coffee snob – no longer could I drink cheap coffee. Instead, I had to drink top quality. And that hasn’t changed even 7 years later.
I couldn’t find a coffee cozy that was just right so instead of I made my own. (I’m not type A or anything…) And then I decided to share it with all of you.
Granny Style French Press Cozy
Materials:
I hook
Worsted weight yarn – about 30-50 yards of each colour.
Instructions:
Ch 31
Row 1: In 3rd chain from hook dc 3 in stitch.* Skip 2. 3dc.* Repeat from * to * until end of row. (10 clusters)
Row 2: Ch 3, Work 3dc in each space between clusters, Dc in ch 3 from previous row. (9 clusters)
Row 3: ch 3, word 3 dc between first ch 3 and cluster and then between each cluster after that. (10 clusters)
Repeat Row 2 and Row 3 until you’ve reached desired height. (Roughly 10 rows or approximately 5 inches)
I alternated colours every 2 rows.
Attaching a new colour if you want for the border:
Row 11: sc all around with 2 sc in each corner. (I had 29 across the widest edge, 15 sc down each side – basically one sc in the ch 3 and 2 sc in the dc of each colour)
Row 12: Work the border of your choice. I used this simple border except I used tr stitch instead of dc. Slip stitch to connect.
The treble stitches will be in front. Slide the stitch over towards the back, creating a bit of a puff in the front.
Ch 5 and slip stitch to the opposite corner (this will be the little over hang above the handle).
Finish off.
At the other bottom corner, attach yarn and ch 16. Slip stitch back along the ch. Repeat on opposite corner (ties for under handle.)
Repeat for another set of ties in the middle if desired.
Weave in all the ends, wrap around your French press and enjoy hot coffee!
I pay for patterns sometimes. If there’s something I really want to make and I have no idea how to go about it, I will for sure go out and pay for the pattern. But then other times…
So I’ve made a few kimonos for newborns and then the pattern I used went from free to $6.95. Now, that’s fine, but I just can’t imagine paying for that.
So I made my own. And I’m keeping it free.
Thanks to feedback over the last while, I’ve included a video of how to increase! Also, there was an error on row 2 – it used to say hdc 9 in the middle portion, but it’s actually 10!
Without further ado… here’s the pattern!
Materials needed:
H hook
Worsted weight yarn – about 150 yards + a small amount of contrast yarn if wanted.
Notes:
* ch 1 at the beginning of the row does not count as a stitch
* I don’t make a hole in the pattern for the tie to feed through because I feel like there’s enough space between stitches to do this.
* Gauge – 9 rows & 12 stitches – roughly 4″
* When you are going to do the hdc-ch1-hdc, you skip the first hdc, then hdc-ch1-hdc in the ch1 space, then hdc in the next hdc. If you don’t skip the first hdc, you’re going to end up with waaaayyyyy too many stitches.
Yolk:
Ch 31 Row 1: hdc in 2nd ch from hook, hdc across (30) Row 2: Ch 1, 2hdc in first stitch, hdc-ch1-hdc in 2nd stitch, hdc in next 7 , hdc-ch1-hdc in next, hdc in next 10 , hdc-ch1-hdc, hdc in next 7 , hdc-ch1-hdc in 2nd last stitch, 2hdc in last stitch (36) Row 3-13: ch 1, 2hdc in first stitch, *hdc up until ch 1, hdc-ch1-hdc in the ch 1 space*, repeat until last stitch, 2hdc in last stitch (increasing by 6 each row)
At the end of the 13th row you should have a total of 102 stitches.
If you want to check your work it should go:
Row 3: 42, Row 4: 48, Row 5: 54, Row 6: 60, Row 7: 66, Row 8: 72, Row 9: 78, Row 10: 84, Row 11: 90, Row 12: 96, Row 13: 102
Armhole forming:
Row 14: ch 1, 2hdc in first stitch, hdc until ch1 space – yarn over, slip hook into first ch 1, slip hook into next ch-1, complete hdc (first armhole made), hdc until ch1 space – yarn over, slip hook into first ch 1, slip hook into next ch-1, complete hdc (second armhole made), hdc to last stitch, 2hdc in last stitch.
You’ve formed both arms and you will now be working on the back and lengthening each side to create the wrap section.
Row 15-21: 2hdc in first, hdc across, 2hdc in last.
Fasten off and weave in ends.
Sleeves:
Row 1: Ss in stitch under armpit. With right side facing, hdc around. (21)
Rows 2-12: ch 1, hdc around, ss to first chain. (Arms will be roughly 6″ in length)
Repeat for second sleeve.
Contrast colour:
Attach a contrast colour to the end of a sleeve and sc around. Slip stitch to first stitch. Fasten off & weave in ends. Repeat on other sleeve.
Attach yarn to one corner.
Ch 1, Sc around front of kimono. When you reach the next corner, chain 30, slip stitch back along the chain (this is your first tie). Continue with sc along back of sweater. When you come to the other corner (where you started), chain 30, slip stitch back along the chain, slip stitch to first chain. Fasten off and weave in ends.
You will still need to make the ties on the sides. I don’t make a hole in which to thread the ties through because I find that I have enough room with hdc stitch. I thread the tie through one side and then attach the contrasting yarn at that stitch, chain 30, slip stitch back, slip stitch to attachment and fasten off.
For the opposite side you can eyeball it to determine where the tie will sit.
And voila! Kimono!
I kindly ask that you give me credit if you use my pattern and that you don’t use my pattern as your own.
I had really wanted to make my little man a yoda hat. Mostly because he kept asking me for one. I searched and search and although there are some fantastic patterns out there, I just didn’t find one that I liked. So I made my own. And I’m SUPER happy with how it turned out. I’m all for making my patterns free so here we go!
This hat in specific fits roughly a 5-10 year old but you can use the ears on any size hat!
Hat:
Magic Ring – make 7 hdc in magic ring (7)
(*If you don’t know how to make a magic ring, then ch 2 and hdc 7 in the 2nd chain from hook.)
Join with a ss.
At the beginning of every row I ch2 and start my first stitch in the same stitch as the ch2. At the end of every row I slip stitch to the first stitch. This creates an invisible seam – or more invisible than other ways anyway!
Row 2: ch 2, 2hdc in each stitch (14)
Row 3: ch 2, *2 hdc in first stitch, hdc in next stitch*. Repeat from * to * around. (21)
Row 4: ch 2, *2 hdc in first stitch, hdc in next 2 stitches*. Repeat from * to * around (28)
Row 5: ch 2, *2 hdc in first stitch, hdc in next 3 stitches*. Repeat from * to * around (35)
Row 6: ch 2, *2 hdc in first stitch, hdc in next 4 stitches.* Repeat from * to * around (42)
Row 7: ch 2, *2 hdc in first stitch, hdc in next 5 stitches.* Repeat from * to * around (49)
Row 8-16: ch 2, hdc around (49)
Row 17: ch 1, sc around (49)
Fasten off and weave in ends.
Ears (make 4):
sc dec = sc decrease – insert hook into first stitch, pull yarn through, insert hook into second stitch, pull yarn through, yarn over and pull through all 3 stitches.
I ch 1 at the beginning of each row but it does not count as the first stitch.
Ch 8
Row 1: sc in 2nd ch from hook and in each across (7)
Row 2: sc across (7)
Row 3: sc in first 3, 2sc in next, sc in last 3 (8)
Row 4: sc in first 4, 2sc in next, sc in last 3 (9)
Row 5-7: sc across (9)
Row 8: sc in first, sc dec, sc across (8)
Row 9: sc across (8)
Row 10: sc in first, sc dec, sc across (7)
Row 11: sc in first, sc dec, sc across (6)
Row 12: sc in first, sc dec, sc across (5)
Row 13: sc in first, sc dec, sc across (4)
Row 14: sc in first, sc dec, sc across (3)
Row 15: sc in first, sc dec(2)
Row 16: sc dec (1)
Finish off.
Take 2 ears and place them back to back. Starting at the bottom right corner, sc all the way around the ear making sure you are going through both ears. This makes the ears thicker and sturdier so that they don’t flop all over the place.
Once you get to the bottom left corner, leave a long tail (about a foot) to use to sew on to hat.
Repeat with the other 2 ears.
Place the ears on each side (I sewed on my ears between rows 8-13) and sew on to hat. Feel free to put a bit of a curve into the ears.
Sew in all the ends and voila! Yoda!
Please feel free to sell anything made from this pattern but please DO NOT sell the pattern as your own or copy it unless you have written permission from me. If you are selling on etsy or somewhere else, I would love a link back to my pattern.
Don’t hesitate to ask me any questions or let me know if something isn’t clear!
Well let’s be honest. I’m pretty brutal at posting but I have a new post and a new pattern for you!
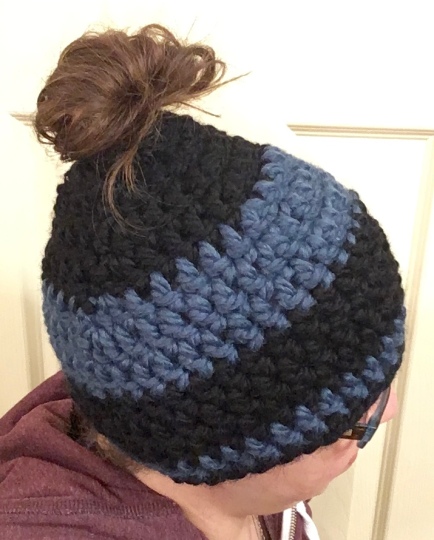
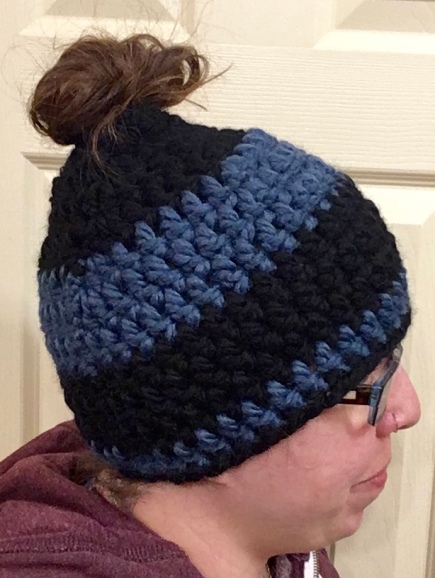
The Fancy Everyday Beanie is a quick and easy crochet and looks super awesome!
Materials: Worsted weight yarn I hook (5.5)
Notes:
I work in the round joining each round to the next with a slip stitch. I chain 2 at the beginning and hdc in the same stitch. This creates a bit of a hidden seam.
Directions:
Magic Circle 8 hdc Row 2: 2hdc in each stitch (16) Row 3: *2hdc in first stitch, hdc in next*, repeat from * to * around (24) Row 4: *2hdc in first stitch, hdc in next 2*, repeat from * to * around (32) Row 5: *2hdc in first stitch, hdc in next 3*, repeat from * to * around (40) Row 6: *2hdc in first stitch, hdc in next 4*, repeat from * to * around (48) Row 7: *2hdc in first stitch, hdc in next 5*, repeat from * to * around (56) Row 8: *2hdc in first stitch, hdc in next 6*, repeat from * to * around (64) Row 9-12: hdc around (64) Row 13: ch 3, dc in same stitch. *skip 2, in next stitch 2dc, ch1, 2dc*, repeat around until 3 stitches left. IN last stitch 2dc ch 2, slip stitch to 3rd chain in starting. Row 14: hdc around (64) *Note that in order to get 64 around you basically need to not hdc in the chains. Row 15: Repeat row 13. Row 16: hdc around (64) Row 17-19: sc around (64)
Feel free to add a flower, or a skull, or some other funky addition to the hat!
So it’s been at least a decade since I last posted anything (or really, maybe 6 months), but that’s what happens when life takes over.
I’m still teaching yoga (you can find my current schedule here), still cooking gluten free goodness, and dabbling in the world of vegetarianism. More like flexitarianism but eh.
In my spare time (ha!), I crochet and knit. And I’ve started making my own patterns which I’m going to start posting for the world to share. I don’t like paying for patterns so mine will always be free. You can sell anything you make from the patterns, but I’d love some credit. And finally, please don’t post my pattern and claim it as your own. That’s just really not cool.
Anyway, on to fingerless gloves. I love them. I wear them when I crochet and knit because my hands get really cold, but somehow wearing the fingerless gloves, they stay warm. These work up super fast and of course you can change them to make them your own. You can make the ribbing longer, you can add more rows at the top to make them go higher up. I made my first pair striped, but you can make them solid colours too!
Without further ado:
Supplies Needed:
Worsted weight yarn (about 100yds)
H hook (5.0mm)
Abbreviations:
ch – chain
ss – slip stitch
sc – single crochet
hdc – half double crochet
Cuff:
Ch 11
Row 1: hdc in 2nd ch and remaining (10)
Rows 2-14: hdc in back loops only (10)
Join using a slip stitch to first row to create the cuff (it helps if you use just the back loops of row 12 to keep it looking ribbed).
Turn your work so the cuff is now at the bottom and continue with the hand.
Hand:
The hand is worked around joining each row. This helps with colour changes to look smoother. Join each row to the first ch using a ss.
Row 1: Ch 1 and evenly sc 27 around (this forms the base of the hand). Join with a slip stitch.
If you’ve made mittens before, then you’ll know about making a thumb gusset. That’s essentially what we’re going to do here:
Row 2: Ch 2, hdc in first stitch, 2 hdc in next 2 stitches, hdc remaining. (29)
Row 3: ch 2, hdc around (29)
Row 4: ch 2, hdc in first stitch, 2hdc in next, hdc in 3rd, 2hdc in next, hdc remaining (31)
Row 5: ch 2, hdc around (31)
Row 6: ch 2, hdc in first stitch, 2hdc in next, hdc in 3rd, 4th and 5th, 2hd in 6th, hdc remaining. (33)
Row 7: ch 2, hdc around (33)
Row 8: ch 2, 2hc in 1st stitch, skip next 7 stitches, 2hdc in next, hdc remaining (28)
Row 9-14: ch 2, hdc around (28)
Row 15: ch 2, 2hdctog, hdc 8, 2hdctog, hdc 8, 2hdctog, hdc 6 (25)
Finish off and weave in ends. Turn inside out and wear proudly!
Celiac, Shellfish-allergic, soy-free mama to 2 kids: 1 celiac, soy-free girl (Miss A), and 1 peanut-allergic, celiac boy (Mr Man). Allergy free husband (Chef Husband) that keeps us all sane. Sole goal: keep us healthy.